


I recently started an NFT smart contract programming tutorial in Solidity, using the ERC-721 standard here on the blog, and this is the second part of this tutorial. If you haven’t implemented the first part yet, it is mandatory and can be found at this link.
In the first part, we implement a MyNFT contract, and all 9 functions and 3 mandatory events of the pattern. However, the standard is very minimalist. It only determines how the interaction for transfer, delegation, and verification of ownership of the NFTs registered in the contract will take place. It does not determine, for example, how can mint/mint NFTs, destroy them, prevent minting new ones, and so on, common tasks in this environment.
Also, you might have missed the content of the NFTs themselves. After all, all we’ve recorded so far have been tokens represented by ids. But if I am the NFT id 57 owner, what does that mean anyway? An image? An MP3? A physical property? The standard defines how metadata can be stored, and we’ll cover that in part 2.
Let’s go!
Minting
Two very common tasks in NFT contracts are Minting and Burning. But what are they? Let’s start by explaining minting, and I’ll come back to Burning in the future.
Minting is the act of minting tokens, and we use this word instead of creating or generating in allusion to the physical process of minting coins, widely used in antiquity. Minting an NFT is nothing more than actually creating it, usually already transferring its ownership to someone. And although a mint function is not present in the ERC-721 standard, it is almost ubiquitous in contracts of this type. Below is a suggestion on how to implement it.
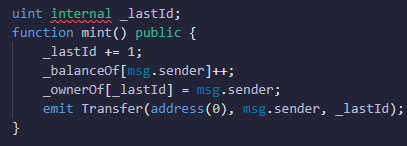
In the above function, we used a state variable to create an auto-incrementing id with each minted token. The id will never repeat itself and will always be 1 more than the previous token. In addition to id generation, the above mint function assumes that msg.sender will own the generated token, so we add the token in the ownerOf mapping and emit the transfer event to signal (learn how to listen for events here).
The above function gives you an idea of how to mint, but it doesn’t help much when it comes to what to mint. If I want to register a photo? An MP3? How do I do? In these cases, although it is technically possible to save the bytes of the digital file on the blockchain, the most common thing is to save only the URL of the file in question, which will be stored elsewhere, to save on transactions, especially for large collections. This approach is so common that it is foreseen in the 721 specifications as an option, defined by the interface below (copy and paste it into your MyNFT.sol file, along with the other interfaces).

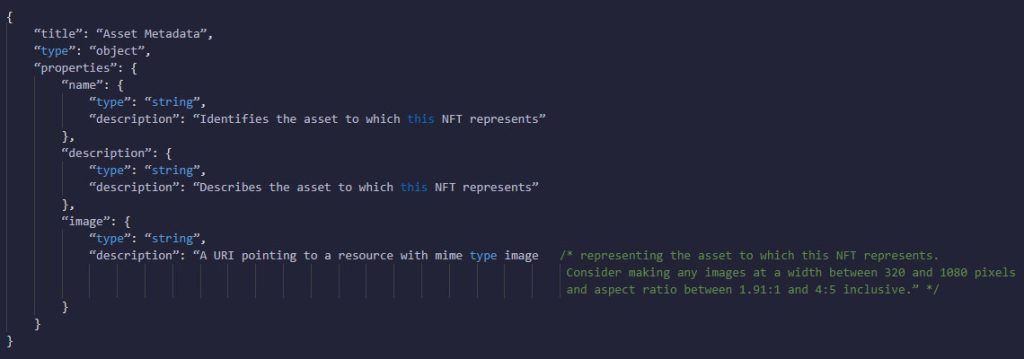
This interface defines that collections of NFTs must have a name, an abbreviation (symbol) and that they must register a URL for each coined token, and that this URL must lead to a JSON with the metadata of the token, whose format is also included in the specification as being below.
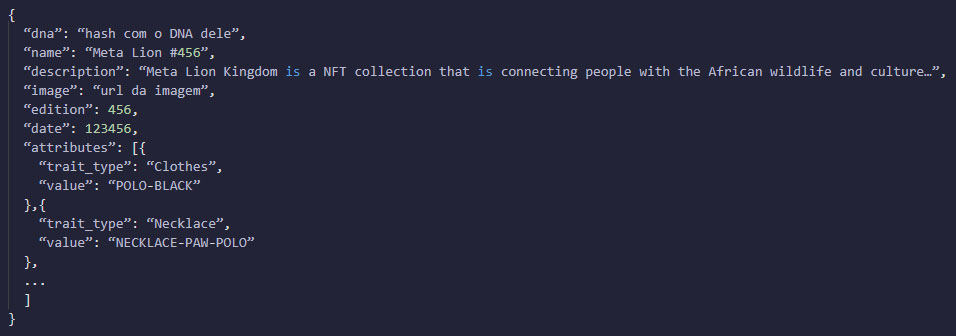
In short: the NFT JSON must have the relevant information, whatever is necessary, and must be publicly hosted on the Internet (the most common being to use IPFS for this). Below is a real example of NFT JSON from a collection called Meta Lion Kingdom. I’ve just omitted some information to make it easier, but you’ll see that the idea is the same as the specification, although I’ve included additional things.
Implementing Metadata
To serve as an example of implementing metadata (the JSON I mentioned above), let’s adjust our mint function so, that it includes the JSON URL of your NFT. I won’t show here how to create the JSON or to host it, as it’s beyond the tutorial scope. I’m going to assume that you already have these JSON somewhere or that you’re going to create them later.
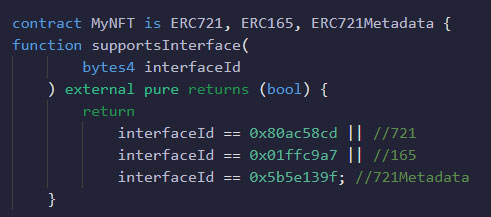
First, add the ERC721 metadata interface to your MyNFT.sol with the other interfaces. Then, tweak your MyNFT contract to add inheritance from that interface as well, as well as we need to tweak the supportsInterface function to signal that we are also supporting the new interface.
Then, the next step is to implement the mandatory functions of the new interface: name, symbol, and tokenURI.
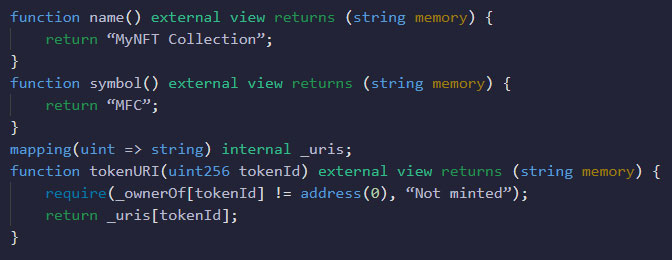
The name function must return the name of the collection, the symbol function must return the abbreviation, and the tokenUri function must, based on the token id passed by the parameter, return the JSON URI with its metadata. Or error, in case it hasn’t been minted yet.
Notice that I created a mapping to record the URI of each of the tokens (tokenId => uri). This URL will be automatically generated in the minting function, which we have to adjust. Before doing this, add an import at the top of your file to include OpenZeppelin’s Strings.sol library (if using HardHat, you should install OpenZeppelin’s contracts lib and reference from there).

This library has several useful utility functions for string manipulation, including one that converts numbers to string, which we’ll need below since our id is numeric.
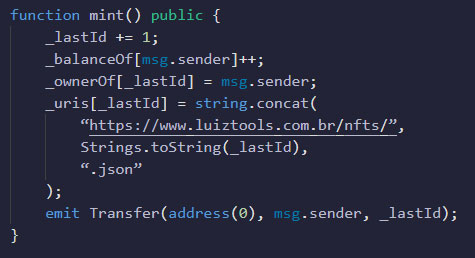
Here is a didactic suggestion where I save the URL of the newly minted token in the URIs mapping. Here I used the string.concat function (available since Solidity 0.8.12) to join any base URL with the token’s id (I used Strings.toString to convert the number to text) and the .json extension. Note that this URL is fictitious. It will not work if you try to access it.
Please understand this mint function with URI only as a suggestion, as it can vary enormously. Another common option is not to store the URLs, but only the base URL, and always generate the URL dynamically when the tokenURI function is called.
Minting Suggestions
Here are some variation ideas that can be combined:
-> Self-Mint: in the constructor, just for you to register your property on the blockchain (I showed it in part 1);
-> Mint-URI: where the requester passes the URI that he wants to register on the blockchain;
-> Mint-Payable: where the requester has to pay for the NFT that will be minted;
-> Mint-Hash: where the token’s id is generated from some hashing function like keccak256 to be unguessable;
-> Mint-Random: where the requester wins a random NFT from the collection;
-> Mint-Bytes: where the bytes of the digital property is registered in the blockchain itself (high cost, low performance, high decentralization, and high security);
-> Mint-IPFS: where the NFT file is saved on IPFS, and only its hash is saved on the blockchain;
-> Mint-Backend: where the only person who does the mint is your backend, requiring a parameter to pass who will receive the token (fewer fees for the user);
-> Mint-AccessControl: where you can only mint which has some specific permission in the contract (I explain here);
Obviously, the sky is the limit when it comes to variations of the mint function, and I hope I have brought you a relevant example.
*The content of this article is the author’s responsibility and does not necessarily reflect the opinion of iMasters.


Leave a comment