


Do you want to make your site work in several languages automatically? Then read on.
I advise you also to do the example reported here.
Hey guys, today I would like to talk and show you how to put your site in multiple languages using the Globalization feature of the web platform. It is important to have a website that supports several languages because the world is open to accessing any website type.
See what I used:
- Visual Studio tool
- C# language
- Web Razor Platform
- .NETCore Framework
The example here will be very simple and at the same time will help you to execute this functionality in
any type of website that uses this technology.
This example automatically searches for the language that the user is using in the browser and to
test, just change the first language, and the site is already updated.
Let’s code
In the Startup.cs class I already started by putting some settings in the ConfigureService method. See
code 1.1
Code 1.1 – ConfigureServices

The first step of the 1.1 code was to add AddLocalization() in the configuration. After that, I added the two cultures that I will have on the site, in this case, English (“en-US”) and Portuguese (“pt-BR”).
Note that the DefaultRequestCulture has the “en-US” culture, which that means if the person is accessing the site in Paris, the first language that will appear on the site is English.
Well, now I need to put a configuration inside the Configure method. See code 1.2.
Code 1.2 – Adding configuration

Note that 1.2 code, I add the RequestLocalizationOptions to the service, and then I tell the application to use the UseRequestLocalization with the desired value.
Well, those were the settings inside the Startup.cs file. Now let’s move on to creating the Resources file.
The first step is to create the Resources folder within the application.
The second step is to create a common class called Resources.cs.
After that, I had to create the Resources.en-US.resx and Resources.pt-BR.resx files inside the Resources folder.
Important point: use the same name for the folder, class, and files. Visual Studio will understand and will place the files inside the class automatically. See image 1.1.
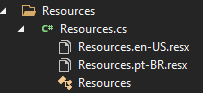
Image 1.1 – Resources folder
Note that image 1.1 shows the resources as if they were inside the Resources.cs class. That is the ace in the hole to make it work.
That way, all pages would be able to access the resources to get any value. There are many ways to do it, but this is the easiest and most centralized in my point of view.
Index.cshtml.cs
Now let’s go to the Index.cshtml.cs page where the dependency injection will take place and then we get the value based on the language of the user’s browser. See code 1.3.
Code 1.3 – Dependency Injection
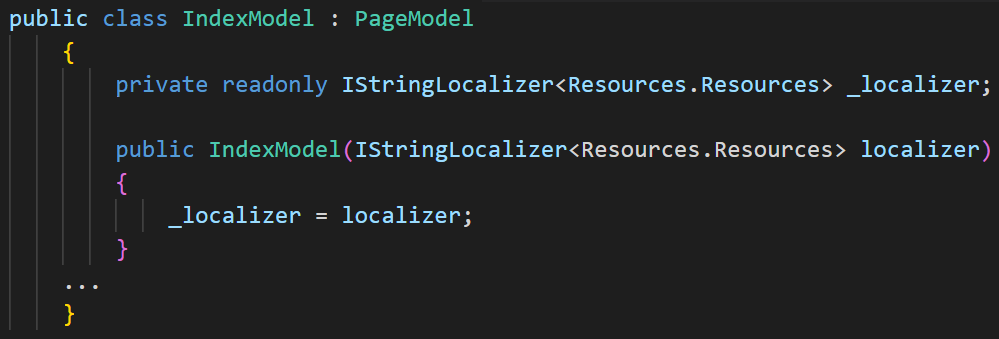
The first step is to declare a variable of type IStringLocalizer, indicating our resource. IStringLocalizer _localizer, and the given name was _localizer.
The second step is to declare it in the constructor of the IndexModel class, passing the values.
Code 1.4 – Class Constructor
With that, I can already get the value declared inside the .resx file, but wait a minute, Mauricio Junior, I haven’t put any value inside the files yet. How do I do? Just double-click on the file and enter a key and value.
See how mine turned out in image 1.2 and image 1.3.
image 1.2
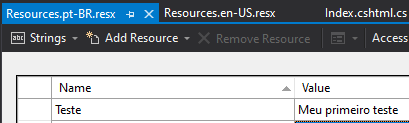
Image 1.3
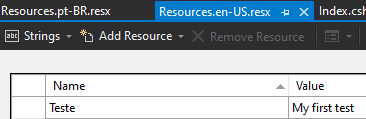
Note that both images have the same key called “Test”, but the values are different based on the language. One in Portuguese and another in English.
To display the value the system automatically gets, we need to use the variable declared in the dependency injection with the key. See the 1.5 code inside the model.
Code 1.5 – Getting the value
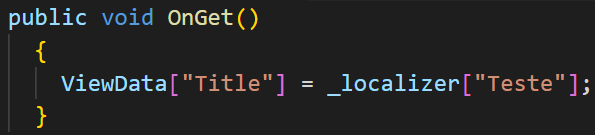
As the key is called “Test”, use the _localizer[“Test”], and the value in English or Portuguese will be displayed without any problem, and now you have your site working in several languages.
The 1.6 code shows the entire Index.cshtml.cs class.
Code 1.6 – IndexModel

I hope it helped, and if you have any questions, you can contact me through my Instagram @mauriciojunior_net or my website mauriciojunior.net.


Leave a comment